Sunday, November 9, 2014
PTU Tutorial ~ Autumns' Evening + FREE Snags

**This tutorial is my own creation, from my own imagination. Any similarities are completely coincidental!**
This tutorial was written in PSP9, but should easily transfer to other versions
Supplies:
Kit: I am using the stunning kit "Autumn's Evening" by Jackie's Jewels. This is one of my "go to" kits when I'm just playing around in PSP - I just love the colors!! You can pick up this amazing kit, along with all of Jackie's other kits from her store HERE.
Tube: I'm using the tube "Coming Untied" ©Barbara Jensen. This was a bonus tube that was offered, but she has so many amazing tubes. Check out her store HERE. Please do not use her work without the proper license!
Mask: I'm using RR_MaskSet11_3 by Rocked by Rachel. You can find this mask set HERE.
Font: I'm using "Birds of Paradise" font. You can find it HERE.
Plugin: Eye Candy 4000: Gradient Glow
Ready? Let's get started!!
From the kit, copy Frame 5, and paste as a new layer on the
canvas. Resize 75%.
Using your Magic Wand, click inside the frame. Selections > Modify > Expand > 3
From the kit, copy Paper7, and paste as a new layer on the
canvas. Resize 60%.
Selections > Invert > DELETE. Move the paper layer under the frame layer. Selections > Select None.
Select the Frame layer and using the Magic Wand, again click in the center of the frame. Selections > Modify > Expand 3.
Copy and paste your tube of choice as a new layer on the
canvas. Arrange your tube inside of the frame to how you like. Selections > Invert. DELETE. Selections > Select None. Change the blend mode of this layer. I used Screen.
From the kit, copy Leaf Swirl, and paste as a new layer on the canvas. Resize 90%. Apply a drop shadow of your choice.
Copy and paste your tube of choice as a new layer on the canvas. I mirrored my tubes so they're facing each other, but it's your choice.
From the kit, copy Ladder, and paste as a new layer on the
canvas. Resize 60%. In the layer palette, right click and Duplicate. Image > Mirror. Apply a drop shadow of your choice to each ladder.
From the kit, copy Lamp, and paste as a new layer on the
canvas. Resize 40%.
Apply a drop shadow of your choice.
Using your Eraser tool, with these settings:
Erase part of the lamp so it looks like it is hanging off the ladder:

From the kit, copy Box 1, and paste as a new layer on the
canvas. Resize 65%. Image > Mirror. Apply a drop shadow of your choice.
From the kit, copy Flower 2, and paste as a new layer on the
canvas. Resize 70%.
Apply a drop shadow of your choice.
From the kit, copy Flower 1, and
paste as a new layer on the canvas.
Resize 75%. Apply a drop shadow of your choice.
From the kit, copy Leaf 1, and
paste as a new layer on the canvas.
Resize 85%. Image > Mirror. Apply a drop shadow of your choice.
From the kit, copy Leaf 2, and
paste as a new layer on the canvas.
Resize 65%. Image > Rotate > Right > 15 > All Layers UNCHECKED. Apply a drop shadow of your choice.
From the kit, copy Leaf Bundle, and paste as a new layer on the canvas. Resize 70%. Duplicate. Image > Mirror. Apply a drop shadow of your choice to both layers.
From the kit, copy Rose 2, and paste as a new layer on the
canvas. Resize 60%.
Duplicate, and paste as a new layer on the canvas. Resize Resize 75%.
Apply a drop shadow of your choice to both roses.
From the kit, copy Rose 1, and paste as a new layer on the
canvas. Resize 55%. Duplicate. Apply a drop shadow of your choice to both roses.
From the kit, copy Berries 4, and paste as a new layer on
the canvas. Resize 50%.
Apply a drop shadow of your choice.
From the kit, copy Acorns, and paste as a new layer on the
canvas. Resize 50%. Duplicate. Apply a drop shadow of your choice.
Resize your tag at this time, if needed, to keep the name and copyright from being distorted.
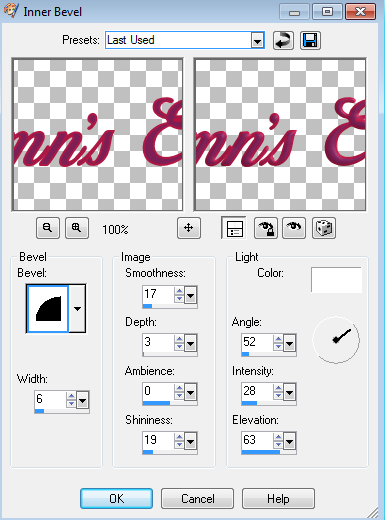
For the name, I used Birds of Paradise, size 72, stroke width 2.0. Set your FG to: #af1742 and your BG to #7d0f50.
Type out your name. Effects > 3D Effects > Inner Bevel with these settings:
In Eye Candy 4000, apply Gradient Glow with these settings:


The "Glow" color is: #c48c53
Add your copyright and license information. Layers > Merge > Merge Visible. Save as a PNG and you're done!
Now for those snags!! Please click on each for the full size!


Subscribe to:
Post Comments
(Atom)
Ty for the gorgeous snags
ReplyDeleteSnagged :). Thank you!
ReplyDelete