Tuesday, January 27, 2015
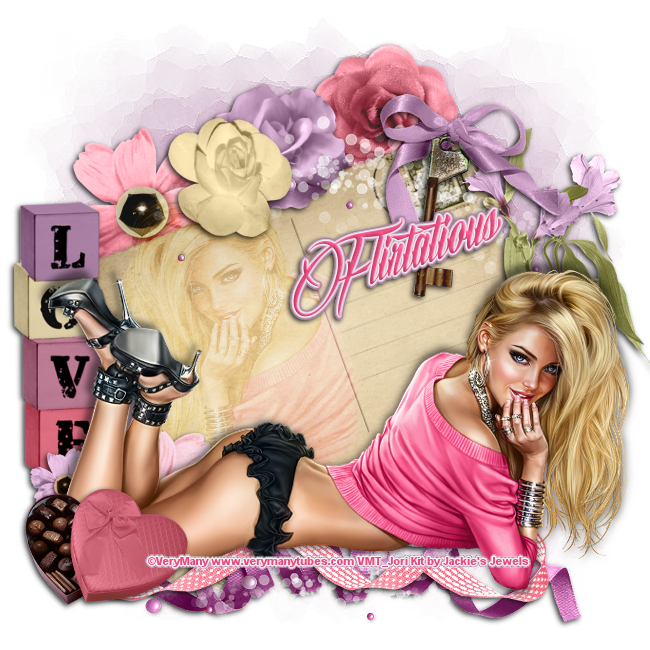
PTU Tutorial ~ Flirtatious + FREEBIE SNAGS!!
**This tutorial is my own creation, from my own imagination. Any similarities to any other work is purely coincidental!**
This tutorial was written in PSP9, but should easily work in other versions!
Supplies:
Scrap kit: I'm using the fun and gorgeous kit Flirtatious by Jackie's Jewels. You can pick up this beautiful kit at Pimpin' PSPers Warehouse.
Tube: I'm using the artwork of VeryMany and the tube Amelia. You need to purchase this work and have a license to use it. You can find this tube HERE.
Mask: I'm using Mask 27 from HorsePlay's Pastures. You can pick up this mask HERE.
Font: I'm using the font Billion Stars, which you can find HERE.
Plugins: Eye Candy 6: Gradient Glow (optional)
Ready? Let's get started!
Open a new canvas, 650x650, transparent background.
From the kit, copy JJS_30 and paste as a new layer.
Image > Rotate > Left > 20
Using your Freehand Selection Tool, Feather set at 10, draw an oval on the left had side of the postcard:

Paste your tube as a new layer and position it within the circle of marching ants. Selections > Invert. Delete. Change the layer blend mode to Soft Light.
From the kit, copy JJS_85and paste as a new layer. Resize 80%
From the kit, copy JJS_15and paste as a new layer. Resize 45%
From the kit, copy JJS_20and paste as a new layer. Resize 45%
Image > Flip
From the kit, copy JJS_16and paste as a new layer. Resize 40%
Image > Mirror
From the kit, copy JJS_18and paste as a new layer. Resize 40%
From the kit, copy JJS_24and paste as a new layer. Resize 40%
From the kit, copy JJS_82and paste as a new layer. Resize 75%
From the kit, copy JJS_63and paste as a new layer. Resize 75%
From the kit, copy JJS_79and paste as a new layer. Resize 85%
From the kit, copy JJS_19and paste as a new layer. Resize 85%
From the kit, copy JJS_57and paste as a new layer. Resize 85%
Paste your tube as a new layer.
From the kit, copy JJS_73and paste as a new layer. Resize 70%
Apply desired drop shadow to all of your elements and your tube. I used 2, -2, 80, 7.00.
Add your copyright and name.
Layers > Merge > Merge Visible.
Save as PNG and you're done!
Now for your snags! Please click on each image to save, so that the copyright remains clear!


Subscribe to:
Post Comments
(Atom)
0 comments:
Post a Comment