Sunday, March 1, 2015
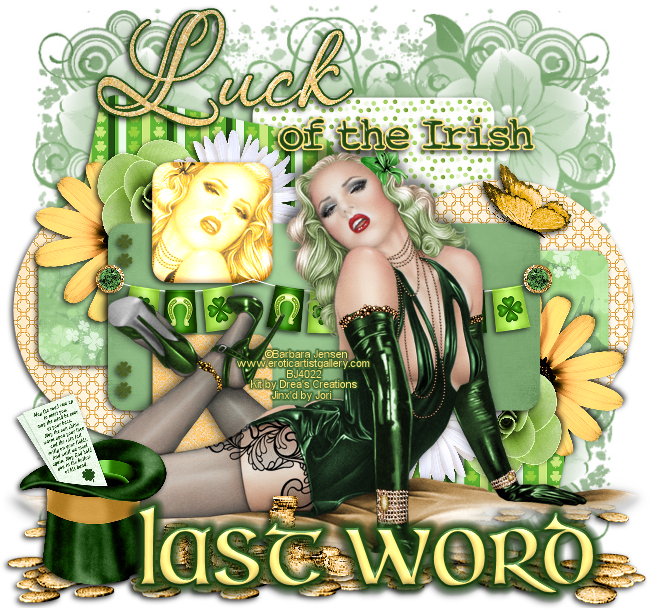
PTU Tutorial ~ Feelin' Irish + Free Snags!

This tutorial is my own creation, from my own imagination. Any similarities are completely coincidental!
This tutorial was written using PSP9, but should easily be completed in other versions.
Supplies:
Kit: I'm using the awesome new kit, "Feelin' Irish" by Drea's Creations. You can pick up this gorgeous kit at any of her stores: Heart Beatz Creationz, Pimpin' PSPers Warehouse or Tiny Turtle Designs.
Tube: I'm using the beautiful artwork of Barbara Jensen. You can find this tube HERE.
Template: I'm using a template from Millie's PSP Madness. You can find it HERE. Be sure to leave her some love!
Mask: I'm using Trese Mask0007 from Trese. You can find all of her amazing masks HERE.
Font: Irish Unicalfabeta can be found HERE.
Plugin: Eye Candy 4000 Glass & Gradient Glow
Ready? Let's get started!!
Open the template.
Shift + D to duplicate it and close out the original. Delete the copyright layer.
Close out the word art layers (click the little eye next to
the layers in the layer palette) so you can build the tag without the word art
getting in your way!
Now, the forum I hang out in the most has a tag size limit of 650x650, so I went ahead and resized the template 86%
and then went to Image > Canvas size > 650 x 650.
For each of the layers in the template, you will need to go
Selections > Select All > Float > Defloat and then paste your chosen
papers as a new layer. Selections >
Invert > Delete. Delete the original
template layer after pasting your kit paper to keep from having odd outlines!
Layer 10 . . . . . DC_Paper
12
Layer 9 . . . . . DC_Paper12
Layer 8 . . . . . DC_Paper15
Layer 7 . . . . . DC_Paper23
Layer 6 . . . . . DC_Paper23
Layer 5 . . . . . DC_Paper16
Layer 4 . . . . . DC_Paper16
Layer 3 . . . . . DC_Paper11
Layer 2 . . . . . DC_Paper11
Layer 1 . . . . . DC_Paper
5
Select the top small square (previously layer 9). Selections > Select All > Float >
Defloat. Paste your tube as a new layer
and move the tube to where the face is lined up with the marching ants. Selections > Invert > DELETE.
Adjust the blend mode to something you like. I used Luminance (Legacy). Merge down with the square. Apply an Inner Bevel with these settings:

From the kit, copy DC_91and paste as a new layer on your
canvas. Resize 30%. Move this layer under the top long rectangle
layer.
From the kit, copy DC_92and paste as a new layer on your
canvas. Resize 20%.
From the kit, copy DC_89and paste as a new layer on your
canvas. Resize 25%.
Add a drop shadow to each flower. Merge the three flowers down to one
layer. Duplicate. Image > Mirror. Image > Flip.
From the kit, copy DC_3and paste as a new layer on your
canvas. Resize 30%
From the kit, copy DC_18and paste as a new layer on your
canvas. Resize 90%
Duplicate. Image >
Mirror.
From the kit, copy DC_17and paste as a new layer on your
canvas. Resize 30%
From the kit, copy DC_97and paste as a new layer on your
canvas. Resize 15%
From the kit, copy DC_52and paste as a new layer on your
canvas. Resize 55%
Move this layer behind your tube so it is stretch across the
rectangle of the template.
From the kit, copy DC_10and paste as a new layer on your
canvas. Resize 15%
Move this layer to the end of the flag banner to act as a
pin. Duplicate. Image > Mirror
For the Word Art…
With “Luck”:
Selections > Select All > Float > Defloat.
From the kit, copy DC_Paper12 and paste as a new layer. Selections > Invert > Delete. Selections > Select None. Delete the original “Luck” layer.
Apply Inner Bevel with the following settings:
Selections > Select All > Float > Defloat. Modify > Expand > 2.
Add a new raster layer and move it under “Luck.” Floodfill with #224d17.
Selections > Select None.
Select the top “Luck” layer and merge down. Apply a drop shadow of your choice.
For the other Word Art:
Selections > Select All > Float > Defloat
Floodfill with #224d17.
Selections > Select None.
Apply the same Eye Candy 4000: Glass settings as previously.
Selections > Select All > Float > Defloat. Selections > Modify > Expand > 2.
Add a new raster layer and move it under the “of the Irish”
layer. Floodfill with #ffe47d.
Merge the two “of the Irish” layers down and apply a drop
shadow of your choice.
Add your copyright information.
For the font, I used font size of 72, stroke width of 2.
FG: #224d17
BG: #ffe47d
Apply Inner Bevel with these settings:

Apply Eye Candy 4000: Gradient Glow with these settings:


Apply a drop shadow of your choice.
Layers > Merge > Merge Visible. Save as a PNG and you're done!
Now for those snags!!


Subscribe to:
Posts
(Atom)