My Favorite Blogs
Powered by Blogger.
Saturday, September 27, 2014
PTU Tutorial ~ Punk Rock Girl + FREE Snags!
*This tutorial is my own creation, from my own imagination. Any similarities are completely coincidental!*
This tutorial was written in PSP9, but should easily transfer to other versions!
Supplies:
Kit used is from Drea's Creations, called Punk Attitude. It's a great kit with 50 Elements and 15 Papers, a perfect mixture of punk attitude and girly fun! You can pick this awesome kit up for only $1.00 from Heartbeatz Creationz, Pimpin' PSPers Warehouse, or Tiny Turtle Designs.
Tube of choice: I'm using the brand new tube Punk Rock Girl by the amazing artist Trinita. You can buy this and all of her gorgeous tubes at PFD. Please do not use this, or any other tube, without the proper licensing!
Mask of choice: I used MPM Mask 46 from Millie's PSP Madness, which you can pick up HERE. Be sure to leave her some love!
Font of choice: I'm using the font Metal Lord for the name, which can be picked up HERE and Arial for the copyright information.
Plugins:
Alien Skin Eye Candy 6: Gradient Glow
Xero: Bad Dream
Ready? Let's get started!!
1. In PSP, open a new document 650x650, transparent background.
2. From the kit, copy DC_47 (pink frame) and paste on the canvas. Resize 55%.
3. Using your Magic Wand, click OUTSIDE of the frame. Selections > Invert.
4. From the kit, copy Paper 2 and paste on the canvas. Selections > Invert > DELETE. move this layer below the pink frame.
5. From the kit, copy DC_46 (black frame) and paste on the canvas. Resize 50%.
6. From the kit, copy DC_41 (silver skull) and paste on the canvas. Place in the middle of the top of the frames.
7. From the kit, copy DC_23 (Bad Girl tag) and paste on the canvas. Image > Rotate > Free Rotate > Left > 30 > All Layers UNCHECKED.
8. From the kit, copy DC_10 (bottle) and paste on the canvas. Resize 30%. Adjust > Sharpness > Sharpen. Move to the upper right side of the frames.
9. From the kit, copy DC_30 (Parental Advisory sign) and paste on the canvas. Resize 30%. Adjust > Sharpness > Sharpen. Image > Rotate > Free Rotate > Right > 30 > All Layers UNCHECKED.
10. From the kit, copy DC_8 (pink cityscape) and paste on the canvas. Resize 60%. Move towards the bottom of the frames.
11. From the kit, copy DC_36 (skull with chains) and paste on the canvas. Resize 50%. Adjust > Sharpness > Sharpen. Move to where it goes across the middle of the frames.
12. From the kit, copy DC_26 (pink phone) and paste on the canvas. Resize 30%. Image > Rotate > Free Rotate > Left > 25 > All Layers UNCHECKED. Move to lower left hand side of the frames.
13. From the kit, copy DC_27 (green MPS player) and paste on the canvas. Resize 25%. Move to in front of the pink phone.
14. From the kit, copy DC_18 (green flames) and paste on the canvas. Resize 45%. Move to in front of the cityscape.
15. Copy and paste your tube of choice. For this tube, I resized 30%. On the layer palette, right click the tube layer and duplicate. On the original tube layer, apply Xero: Bad Dream with the default settings. On the duplicate tube layer, play with the layer blend modes for the effect you want. I used Screen. Right click on the duplicate tube layer and merge down. Adjust > Sharpness > Sharpen.
16. From the kit, copy DC_14 (headphones) and paste on the canvas. Resize 25%. Place by tube's arm.
17. From the kit, copy DC_28 (shoes) and paste on the canvas. Resize 30%. Adjust > Sharpness > Sharpen. Place by tube's feet.
18. From the kit, copy DC_40 (dog) and paste on the canvas. Resize 30%. Place by shoes. Adjust > Sharpness > Sharpen.
19. Apply a drop shadow of your choice to the elements, frames and tube. I used 2, 2, 80, 9 with the color Black.
20. Copy and paste Paper 1 from the kit. Layers > Arrange > Send to Bottom. Now, the paper is bigger than our canvas, so you can either resize it (around 81%) or you can use your crop tool and the Merge Opaque. This will help keep any funky lines from showing up on the completed tag!
21. Layers > Load/Save Mask > Load Mask from Disk. Apply your mask.
21. In the layer palette, find your mask layer (should be at the very bottom), right click > Merge > Merge Group.
22. For the name, set your Foreground color to #95f162 and your Background color to #ff7ab7. Set your background color to Gradient Foreground/Background with these settings:
23. I used the font Metal Lord, size 60, stroke width 2, create as vector. Type your name/saying.
24. Center and/or stretch your name as you would like.
25. In the Layer Palette, right click on the font layer and Convert to Raster Layer.
26. Apply Inner Bevel with these settings:
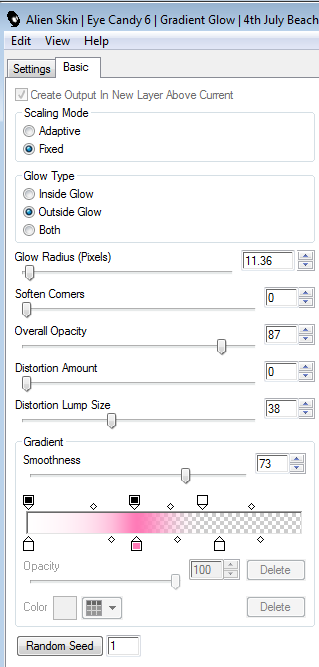
27. Apply Eye Candy 6: Gradient Glow with these settings:
28. Apply Eye Candy 6: Gradient Glow with the same settings, except this time, change the pink middle color to the green foreground color.
29. Apply a drop shadow of your choice.
30. Resize your tag as needed. Add your copyright information.
31. Layers > Merge > Merge Visible. Save as a PNG and you're done!
I hope you enjoyed this tut and I would love to see your results!
And now, for your Free Snags!! Just click on the image to get the full size and save!
Subscribe to:
Post Comments
(Atom)


0 comments:
Post a Comment