My Favorite Blogs
Powered by Blogger.
Friday, September 5, 2014
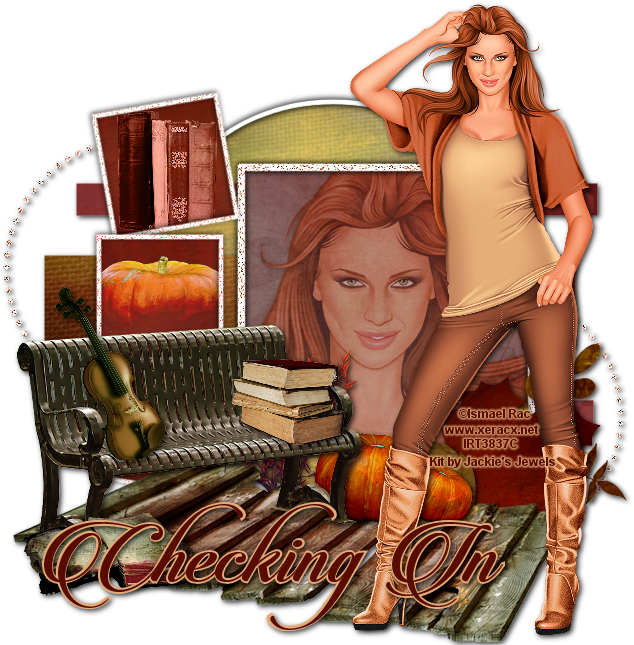
PTU Summer's Dying Wish Tut + FREE Snags!
This tut was written in PSP9, but should work in other versions.
Supplies:
Tube of choice. I'm using Ismael Rac's 2013 Warm Attitude tube which can be purchased HERE
Kit of choice. I'm using the gorgeous kit Summer's Dying Wish by Jackie's Jewels which you can purchase HERE.
Template is Fall 2013 Template #1 from Twyzted T's Playroom, which you can pick up HERE.
Font of choice. I used Candlescript, which you can pick up HERE.
Ready? Let's get started!
Open your template in PSP and Shift + D to duplicate it. Close out the original and erase the credit layer on the duplicate. The forums I tend to hang out in the most have a max tag size of 650x650, so I resized (All Layers) my template by 98% to get it under that mark, then went to Image > Canvas Size and entered 650 for height and 650 for width.
This template has shadows already on it, but if you prefer to use your own shadow settings, you can go through the layer palette to erase the shadow layers.
For each of the layers on your template, you will follow the same basic steps:
1. Select the layer in the layer palette.
2. Go to Selections and Select All.
3. Selections > Float
4. Selections > Defloat
5. Open a paper you want to use and copy it.
6. Back on your tag, and Paste as New Layer.
7. Selections > Invert
8. With the paper you just pasted as a new layer selected, hit Delete on your keyboard.
9. Delete the original template layer (this keeps your tag from having funky outlines on your template)!
10. Selections > Select None
11. Repeat with the next layers.
The papers I used are:
PP5 (used twice)
PP3
PP2
PP1 (used four times)
PP9 (used twice)
PP7
You can, of course, use any combinations of the papers you want!
Open your tube. On your layer palette, select Raster 7. Using your magic wand, click inside the square. Selections > Modify > Expand by 4. Copy your tube and place, as a new layer, inside the frame. I wanted my tube nice and big in the frame so I did not resize it. Once you have your tube placed where you like it, Selections > Invert and making SURE you are on the tube layer, hit Delete on your keyboard. Move this tube layer under Raster 7. Selections > Select None. Play with your layer blend modes to find something you like; I used Soft Light.
Paste your tube again as a new layer. I resized my tube by 43% so she could fit on the tag. Place your tube where you want it.
Now to add some elements! The elements I used are:
Bench (resized 60% and mirrored)
Book (resized 45%)
Bush (resized 55%)
Path (resized 95%)
Pumpkins (resized 40%)
Books2 (resized 30%)
Pumpkin (resized 55%)
Books 1 (resized 35%)
Violin (resize 35% and mirrored)
Now to deal with the noise frames and sparkle circles. I like the effect of the noise and sparkles, but they don't quite match the tag, so I colorized them by going to Adjust > Hue and Saturation > Colorize. I used a Hue setting of 15 and Saturation of 162.
Now to give your tag some depth you'll need to add drop shadows to the frames, elements and tube. I used a setting of 2, 2, 80 and 8 on the elements and a drop shadow of 1,1, 80, 8 and -1,-1, 80, 8 on the frames.
If you need to resize your tag, do so now, so as to not blur the copyright! Add your copyright information.
For the name, I used Candlescript, size 72, stroke width 4, create as Vector. Type your name and then in the layer palette, right click on the vector layer and duplicate. On your tag, with your font tool still active, click on the name. Change the stroke width to 0. Convert both vector layers to raster and merge down. Add a drop shadow of choice.
Merge Visible on your layer palette and save your tag!
I hope you enjoyed my tut and I would love to see your results!! Here's some snags for you!
Subscribe to:
Post Comments
(Atom)




0 comments:
Post a Comment